Tuesday, September 7, 2010
Oculus in the News
Oculus was recently interviewed by Preservation Magazine. You can find the article in the September/October issue of Preservation. Here is a link to the magazine's website.
Wednesday, August 25, 2010
Ft. Dalles, New Sash and Sill Repair
One of the openings had a pair of sash that were not original and had been cut down at some point. So after making a new sash plane and a detailed drawing of some of the existing sash I set out to build a pair to replace them. The original sash had a very unique (for Oregon) meeting rail joint, it is a dove-tailed mortise and tenon joint. I ran across this joint last year when I was working on some sash from Iowa, see this previous post.

 This is the pair done and fitted to the opening. The folks at the fort were pleased to see this pair go in as it provides light for the gift shop.


 The rotten sill. Once I removed the rot about 2/3 of the sill remained intact. My general rule is at 50% rot then replacement of the element should be considered. In some cases I would argue that even if just the smallest amount original material is sound it should be saved. It depends upon the historical significance of the structure.

Here is the mortise for the joint.
 This is the pair done and fitted to the opening. The folks at the fort were pleased to see this pair go in as it provides light for the gift shop.
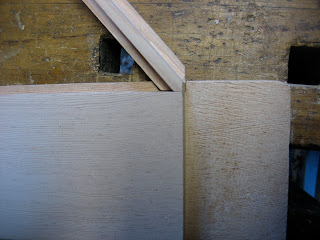
This is the pair next to the existing windows.
The last sash that I had to build was a casement sash that had the same proportions as the pair I just discussed. The opening for this casement is in the office but originally it was the woodshed and privy. The opening was covered by a shutter which has long since disappeared. The fort has some old photos showing the shutter opened. I thought that a casement would be appropriate since it opens in the same direction as the old shutter and the building has casement windows in it already.
Here are some photos of the completed casement.


The casement is the one on the right.
 The rotten sill. Once I removed the rot about 2/3 of the sill remained intact. My general rule is at 50% rot then replacement of the element should be considered. In some cases I would argue that even if just the smallest amount original material is sound it should be saved. It depends upon the historical significance of the structure.
Ft. Dalles, Sill Patch
 Some of the interesting putty techniques that I ran across during the restoration of the sash.
I also found a lot of glazing rabbet modifications.
 The only sill that I found to be rotten was this one on the weather side of the building. Pretty good for a 150 year old building that has been painted only twice in its lifetime. But The Dalles only gets about 14 inches of rain a year (Portland gets around 35-40 inches per year).
Unfortunately the rot went all the way into the beam below the sill.

This is the beam after I cleaned out all the rot.

The D-8 ripping down a salvage beam that Eric donated to the project.

The patch glued and screwed to the existing beam.

The patch hewed down and epoxied.
Sunday, March 14, 2010
Ft. Dalles, Round 1
The first set of sash that I tackled were the 11 upstairs casements. They were fairly simple to remove since they had lift-off hinges and there was really no paint on the exterior to fight with.
 The second problem that I have run into is that a lot of the muntin tongues have been either worn completely away or have been scalped off so a larger piece of glass can be fit into the opening.
The building has only been painted twice since its construction in 1856-7. The first time was when it was first built and then again in 1865. After this point the building was periodically "oiled". With what kind of oil I am not sure of but there is a lot of evidence of it on the first floor sash and glass.
So the result is what you see today. Here is a current photo from a previous post.
This photo shows what kinds of problems that I have run across with these first batch of sash. The first thing I noticed was the variety of glazing putties that had been used over the years. Only one of the types was every painted, the first. Every subsequent re-glaze was not painted and all of it has cracked. Every type also showed how proficient or lack of proficiency the craftsman was at the application.
 The second problem that I have run into is that a lot of the muntin tongues have been either worn completely away or have been scalped off so a larger piece of glass can be fit into the opening.
 The following two photos shows some of the repairs to the muntin tongues.


This close-up shows the angled glue joint I used when only a partial segment of the muntin was missing. Also the new sections were glued down into a small dado that I made with an 1/8" chisel. I left the new tongues higher than what they should be and once the glue was set-up I then planed them flush with the existing tongues.

These last two photos show the sash done and installed back in their openings. The exterior finish paint has not been applied yet because some decisions have to be made concerning color and whether or not the faux graining will be re-applied.


Diamond Update
Here are some of the latest photos from my diamond sash project. After doing a couple of them they certainly get a lot easier.


First two fixed sash finished.

The next two I did were these pair of casements. You can see the next project off to the right.

I had some original photos to go from for the design. They are a bit different than the first pair that I made to flank the chimney.
Wednesday, February 24, 2010
Next Project
 My current project is the Fort Dalles in the Dalles, Oregon. The fort complex was built in the years 1856-57. This location is where the travelers on the Oregon Trail either could choose to float their belongings down the Columbia River to the Willamette Valley or they could go overland. Both routes had their perils. My relations in the 1850's took the overland route which proved to be eventful. The only building left is the Surgeon's Quarters. Quartermaster Captain Jordon and Louis Scholls drew up the plans based upon buildings found in Andrew Jackson Downing"s book, Cottage Residences. More information can be found at this link.
My work will be on the 23 windows in this building, involving two re-builds which entail another custom plane similar to the one I built for my job in Iowa. See this previous post on how I made that plane.
Some interesting things I have discovered about these sash are amazing old glass, hand-cut glazing points, and the original faux exterior paint scheme.
More pictures of these details will be posted soon.
Sunday, January 31, 2010
Kirkbride Update
On January 28th the Salem Historic Landmarks Commission voted to restore rather than replace three facades of windows. The facades face north, west and south and are the windows most visible to the public.
I want to thank everyone who sent in emails or letters. They were much appreciated by those of us hoping to preserve the windows, and made an impact on the Commission. You made the difference.
Tuesday, January 26, 2010
Save the Kirkbride Windows! Email Action and Hearing

Image courtesy of the Oregon State Library
The Oregon State Hospital was built in 1883 in Salem, Oregon. The plan for the structure was based upon the philosophy of Dr. Thomas Kirkbride. Here is a link to more information on other Kirkbride buildings around the country.
Last summer when I toured the rehabilitation of the facilities, the plan for the windows in the main older section was to have them restored and interior storms installed. Recently the group in charge of the restoration decided that the windows are not worth saving. They want to remove them and install new windows.
There comes a point when a person has seen enough destruction of irreplaceable building materials that something must be done.
I will be testifying on Thursday at the meeting of the Salem Historic Landmarks Commission to help try and save these beautiful windows.
Here are some detail photos of one of the sash.

Sash made from clear Western Red Cedar

Square-pegged rail and stile joints.

Really the only thing that needs work is new glazing putty.

Construction lines clearly evident.

Wedged muntin tenons.
Thanks for your help!
Friday, January 22, 2010
Diamond Details
Here are some more photos from the process of making the diamond sash.


I used a lot of small samples. I was able to check the mortises with the sample to make sure the angle was correct.

The muntin tenons are about 1/2" in length.

The muntin that intersects the corners does not have the full tenon on it. I didn't want to weaken the main mortise and tenon joint by cutting into it any more than I had to.


A picture looking down the line of mortises.

Fitting in the short muntins.

Everything fitted and sash is ready for the finishing touches.
Subscribe to:
Posts (Atom)