About a month ago I was contacted by someone looking to replace his replacement sashes. The sashes he has currently are about 10 years old and most of the insulated glass units have fogged up (seal failure). My client has embarked on a journey to recreate the original sashes that were removed.
His house is a classic Portland bungalow. Here is a
link to a discussion about the house and windows on the John Leeke website forum; if anyone is considering removing their original sashes, I recommend taking a look at the discussion. The house was profiled in 1915 in The Craftsman Magazine. My client has a book with the article in it and it says that the house was built by the people that bought the property. For some reason they named the house and property "Waxahatchie".
So I am undertaking the manufacture and installation of some of the diamond pane sash. We have decided to build the two small fixed sashes that flank the chimney.

The first thing I did was to make a detailed scaled drawing of the sash I am building. Unfortunately the two sashes are not exactly the same size, so I will have to make another scaled drawing. The importance of being as precise as possible can not be over emphasized. All the angles for the diamonds are dependent upon this drawing (no original diamond pane sashes remain to use as a template).
Making of the guide sticks. See this
previous post for more information on guide sticks. As with the drawing, two sets of guide sticks have to be made since the sashes are not the same size.

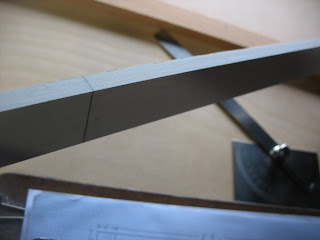
Next thing I made to help with the construction were some small template blocks that have all the angles on them for the diamonds. I will use these to cut all the muntin angles.

All pieces cut to length and ready to saw the tenon checks. I usually punch the muntin mortises as well, but I knew they would be angled so I waited on that.

Running the profile edge.
Making the glazing rabbet with the moving fillester.
The rails and stiles are put together.
After this point things get very interesting.
With all the angles to deal with I decided to make a little mock-up to see how things would go together and it also helped me cut the angled mortises for the muntins.
More to come soon on this project.


 Earlier this year I was asked to participate in a film about Historic Preservation and sustainability. The film's website has just gone up with the film's trailer and some clips from the interviews they did. Click here to see the clip. The film is expected to come out in the spring of 2010.


