Monday, August 3, 2009

Cutting the Sole

In keeping with the hand-built nature of this project I decided to cut the majority of the sole waste with my rip back saw.

The photo above shows the first two cuts I made along the profile (shown in pencil). 

In this shot you can see that half of the waste has been removed and the cut has been made to allow the removal of the second half. 

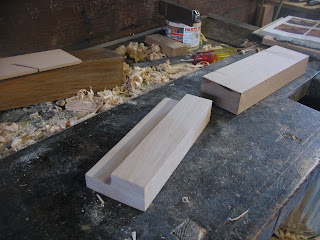
This photo shows the majority of the waste removed. At this point I used the scraper to finalize the shape of the profile. 

Wednesday, July 1, 2009

Making the Plane, part 2

The block for the body was cut out of 2" thick beech.  When looking for material I was seduced by some lovely grain and forgot that the grain should be parallel to the sole of the plane.  It is the most important factor when looking at material for your planes.  When the grain is parallel to the sole there is less likelihood of any movement in the wood which might affect the operation of the plane.
Before I cut the sole of the plane I made a scraper that matched exactly the profile I wanted. According to a chapter in this Garrett Hack book, the final shaping of the sole could be made with a scraper blade.  I wanted to use a nice clean new scraper blade but I found that it was too hard to shape.  Instead, I used an old plane blade donated by my friend Justin.

Wednesday, June 17, 2009

Making The Plane, part 1

So, the first step in making my plane was to do some research.  I have a couple of sash planes that I use often.  I looked at these planes first and did a detailed drawing of the better looking plane.
After reading a couple of texts on the subject I knew that I had to either make or purchase a float.  The floats at Lie-Nielsen are quite nice but a little pricey for me.
I decided to make my own.  I went out looking for steel.  I needed something that was soft enough for me to file but would also hold enough of an edge to file wood.  After running into some dead ends someone at Winks Hardware said I should try key stock.  For about a $1 I got a 1/4" square piece of metal.  I was a bit skeptical at first.  

I filed about half a dozen ridges in it like what I had seen in some books. It was extremely easy to file.  

Here is what it looked like after a few ridges were filed in it.    It works wood brilliantly and I have used it for other tasks since I made it.  I am very pleased with how it functions.

The next thing I made was the pitchboard.  It was a fairly simple template that marks out the cuts that need to be made for the escapement area.

Iowa or Bust


photo courtesy of S. Licht, architect
A unique project has come my way.  I was asked back in December if I would like to build some sash for a project in southwest Iowa.  The structure is a ferry building that was a part of the Underground Railroad network.  The date that the building was constructed was 1850.
We finalized the paperwork in April and I got started right away.
A couple of challenges that I faced were making a sash plane, and working with a material that I rarely work with (Southern Yellow Pine). I'll dedicate future posts to the making of the sash plane as well as the journey of the sashes from their first stages to their installation in Iowa.  

Coquille Lighthouse

Here are some pictures from the finish of the Coquille Lighthouse project.  
Due to some unique challenges I decided to make the sash by hand myself.  I had a lot of fun doing it and am looking forward to my next sash building project.  I would like to thank my friends at Creative Woodworking for providing me with some excellent Alaskan Yellow Cedar.

Making the glass rabbet with the moving fillester.

The tenon for the bottom rail.

Intersection of the muntin bar and bottom rail.

Exterior finished.

Interior finished.

Friday, April 24, 2009

Shavings, shavings and more shavings


I thought this made for a neat picture.  These shavings were made with a dado plane.  I was preparing some material for the Coquille Lighthouse project discussed in the previous post.
I originally started out using my power router to make these dados, but I couldn't stand the racket and dust it made.  I guess I have completely converted to a non-power tool business.

No, this isn't Forks, WA.


Somewhere out there is one of my projects. When they forecast drizzle for the coast they really mean drenching shower with tiny droplets.


Here is the project on a sunny day.
This is the Coquille River Lighthouse located at the beautiful Bullards Beach State Park.
I am currently installing a replica window on the other side of the lighthouse.  There is no original fabric left from the windows.  The Army Corp of Engineers installed large wooden frames and glass in the openings in 1976.  Before this time the building was abandoned and left to the elements which led to the loss of the original windows.  I am working from an architect's drawings which were taken from the original architect's work.  Also there are quite a few old photos documenting the history of the lighthouse.


Here is the D-8 cutting the sill to fit.  It turned out to be a pretty complicated sill due to the addition of some concrete by the Corp in the 1970s.  The sill material is Alaskan Yellow Cedar.  It took me a little time to get used to the smell of it.


You can see all the complicated angles from this scrap.  The sill is purposefully left off the stucco in front, backer rod and a flexible sealant will be used to finish it off at the end.  And the flashing has yet to be installed either.  
This sill was expertly milled by Creative Woodworking.  These guys are awesome.  They always come up with a solution no matter what weird thing I bring to them.


This was the amazing moon set I saw on my last morning there.  
The project is about finished so more photos will be posted when it is complete.